Sega Saturn Battery Mod with Panasonic Eneloops

I’ve been cleaning out old boxes of junk and stumbled on my forgotten Sega Saturn console. Sometime during high school I had taken the wires for the CD-ROM door switch and simply twisted them together to enable using the Swap Trick to play backup games. I decided to implement a better fix by soldering an actual on/off switch and also do a mod of the built-in battery. Unlike the Sega Dreamcast that came after, the Sega Saturn does not use a built-in rechargeable battery for memory saves; it uses a CR2032 lithium battery. According to this Sega Saturn Battery FAQ, the CR2032 has a capacity of 230mAh and will last 1-2 years in normal use or 19 days if the console is unplugged. This FAQ also discusses using other lithium batteries with higher capacities than the CR2032; I decided to try using Panasonic Eneloops instead. They are considered one of the best, if not the best, rechargeable AA batteries on the market; Eneloops have a minimum capacity of 1900mAh and can keep their charge while sitting unused for several years.

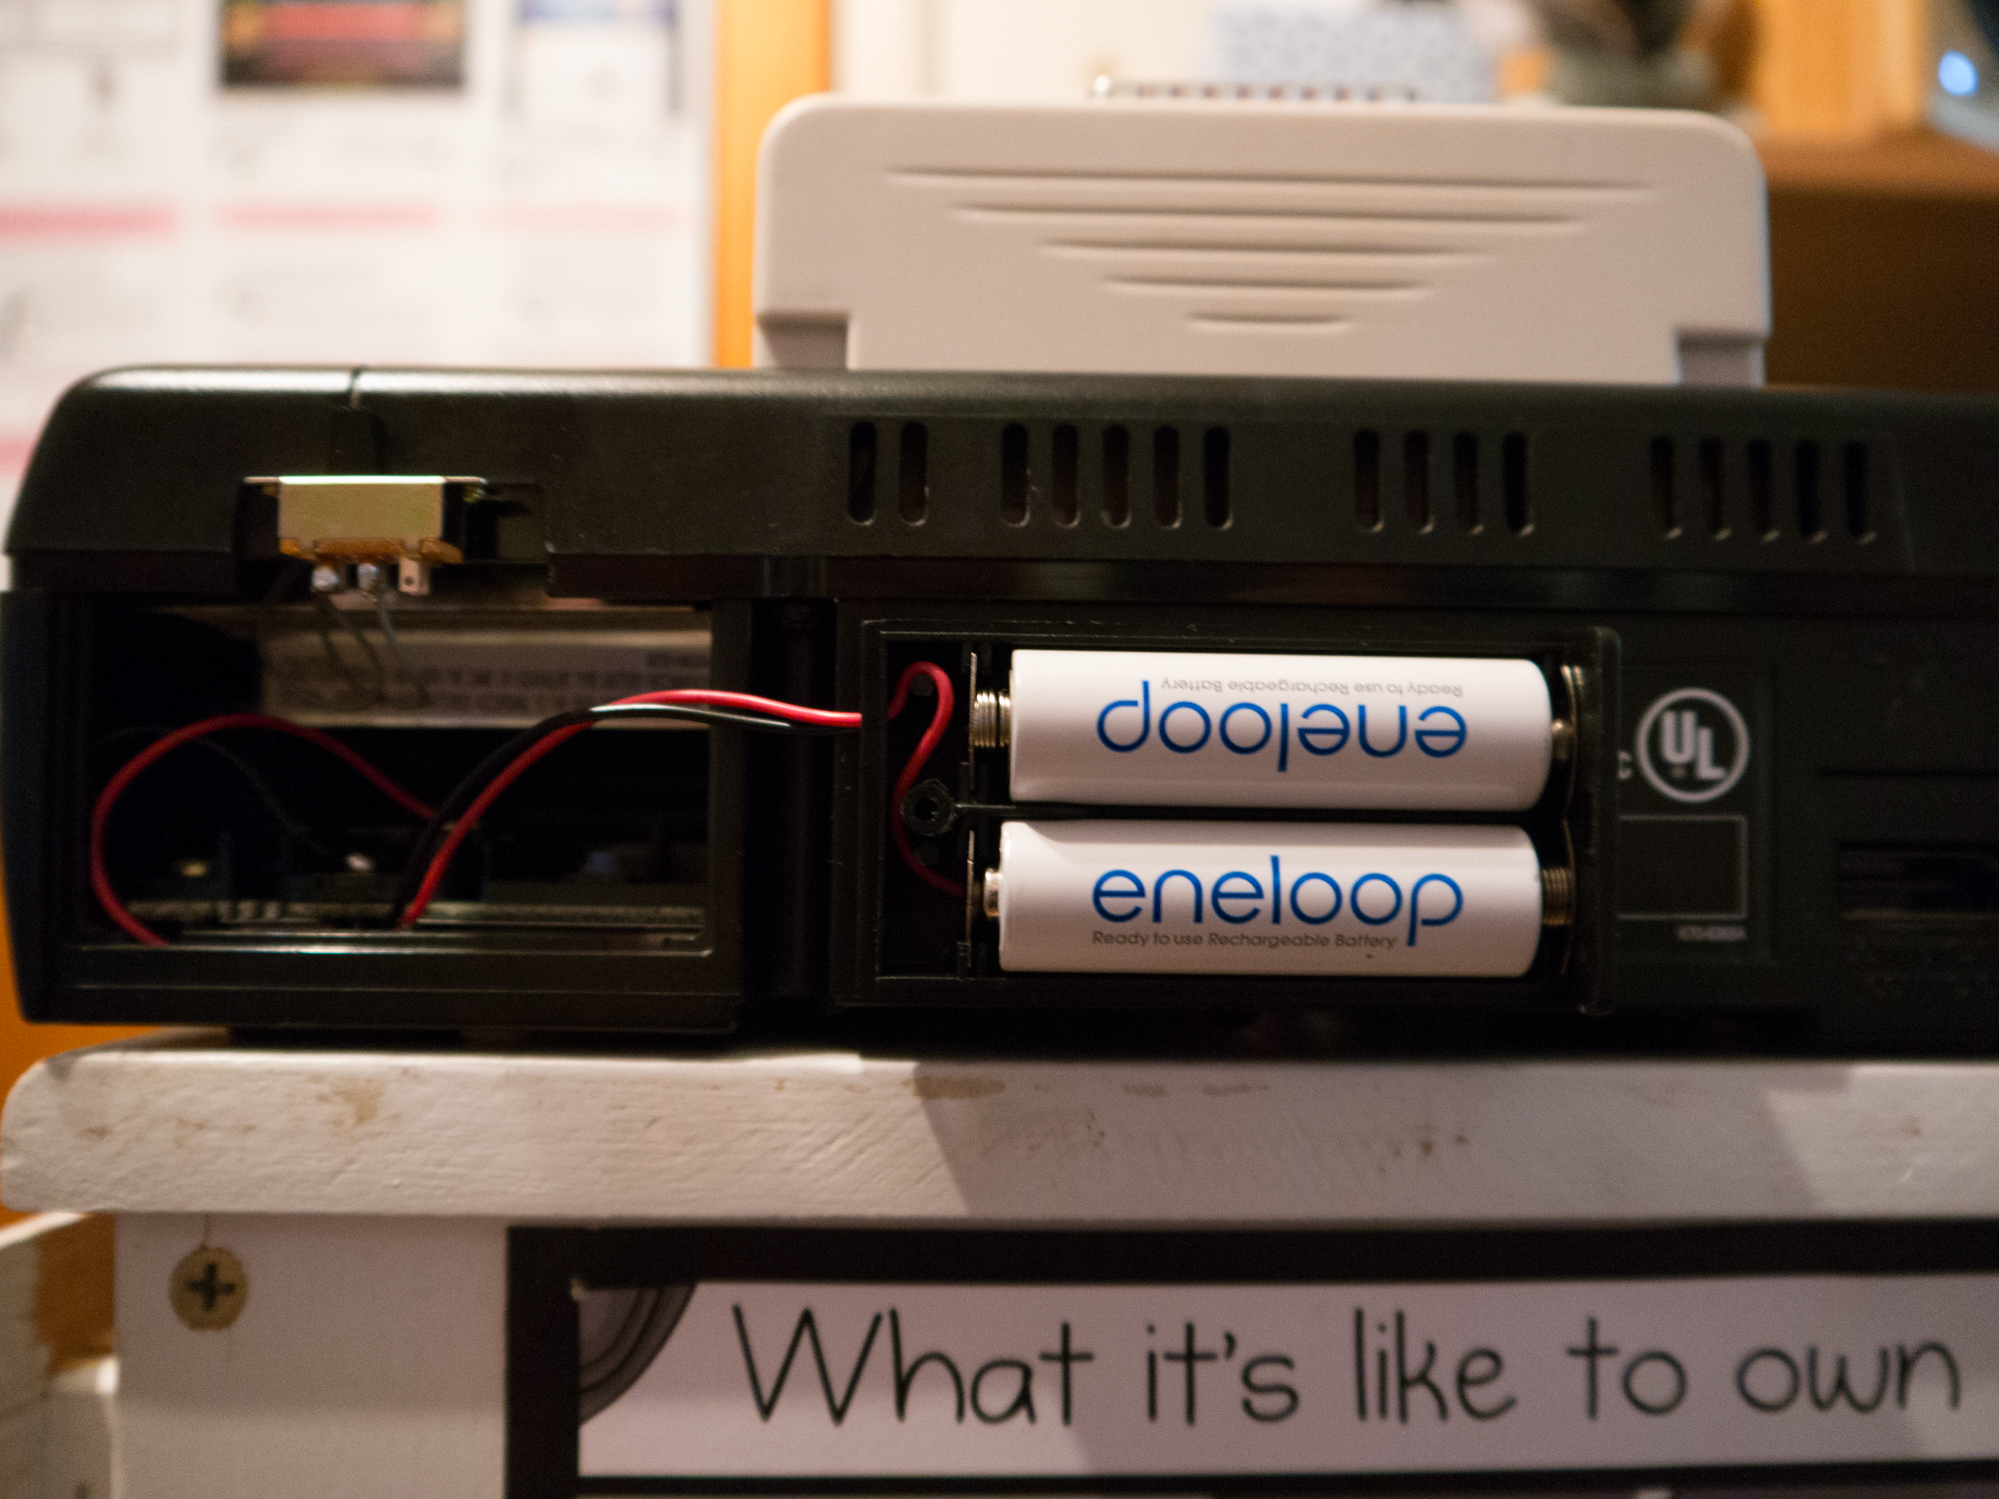
I went to my local Fry’s Electronics store to pick up a 2 AA battery holder, mini on/off switch, and some 3M mounting tape. The battery mod is straight forward; solder the positive sides of the battery holder and the Saturn’s battery contact together and do the same for the negative sides. If you get a 2 AA battery holder, make sure it’s wired in series so you’re getting 3V from the two AA batteries.

Since the Eneloops have a capacity of at least 1900mAh, it should theoretically last much longer than using a CR2032. I’ve had it running since yesterday July 29th; I will make an update in the future on how well it performs. You could also use AA Lithium batteries instead like these.

I lost the cover to the battery compartment so I just mounted the battery holder where you would normally see the model number of the Sega Saturn. You can also see the mini on/off switch mounted above the battery compartment area. Not the cleanest looking mods but it works.

P1010451

Kodibuntu and TL-WN822N v3 Wireless Fix

I have a Zotac MAG HD-ND01-U I bought almost 5 years ago that I use to play movies for the family. Even at the time I bought it, the Zotac was very low end; it ships with an Intel Atom N330 CPU, Nvidia ION GPU, 160GB 5400RPM HDD and 2GB of RAM. It has been since upgraded to a 500GB 7200rpm HDD and 4GB of RAM. Previously I was just running Win7 and using MPC-HC to play movies on the big screen. The Zotac was just barely capable of playing 1080p x264 mkvs with that combination; CPU usage was still very high despite using hardware acceleration in LAV Video Decoder. It was also really annoying waiting for Windows processes (TrustedInstaller.exe and svchost.exe) to stop eating CPU cycles after boot up. I decided it was time to take look at Kodi; a software media center formerly known as XBMC. I made a Live USB of Kodibuntu and spent a couple hours just trying to get it to find my movie library over the network; when I finally got a movie to play, it played perfectly with no jitter and very low CPU usage. If anyone out there is wondering if an Intel Atom and Nvidia ION are enough to play 1080p x264 mkvs, I can assure you it will play perfectly under Kodibuntu. However it will struggle with mkvs encoded in 10bit.

After the successful trial of the Live USB, I rebooted and performed the full installation thinking that maybe the network issue was just the Live USB environment. After the full install, I tried installing updates and the network would stop working after a few minutes. I did some searching online and apparently the driver that ships with Ubuntu based distributions doesn’t work properly with the TL-WN822N v3 USB wireless adapter I was using. I found the solution here via this page of the Ubuntu Community Help Wiki. I’ve included all the commands from the solution below; they will install a patched driver and remove the native one.

OwnCloud 8 on CentOS 6.6 Using Nginx and PHP-FPM

Earlier this week I decided to test drive ownCloud; an open source alternative to cloud sync services like Google Drive or Dropbox. The main difference is that you install and run ownCloud on your own server.

ownCloud provides packages for most Linux distributions including CentOS here; the advantage of installing from the package is that it will automatically install required dependencies and you can  update ownCloud with yum. If you use the ownCloud package, you will also need Remi’s RPM repository as CentOS 6 provides PHP 5.3 and ownCloud 8 requires PHP 5.4.

Since I already had a server running Nginx I decided to skip the package installation of ownCloud because it also installs Apache as a dependency. The steps below can be used to set up ownCloud 8 on CentOS using Nginx, PHP-FPM and MySQL.

Set up Nginx and Remi repos:

Install Nginx, MySQL and PHP components:

Start MySQL and run mysql_secure_installation script to create root password (answer Y to all questions):

Now create the database and user for ownCloud:

Create document root for Nginx and install ownCloud:

Edit /etc/php-fpm.d/www.conf to replace apache user with nginx on lines 39 and 41:

Give nginx user permissions on /var/lib/php/session (this fixed a redirect loop I was getting when trying to login):

Make sure services start automatically on boot:

Now you just need to configure Nginx to work with ownCloud; below is my configuration file that I made based on the ownCloud documentation here.

Once you have Nginx configured correctly, browse to your server and you will be greeted by the following screen where you will create the admin account and provide the details of the MySQL database you created earlier:

ownCloud_setup_page

For added security, you can configure Fail2Ban to protect the ownCloud login page from brute force attempts by using the guide located here: http://www.tech-and-dev.com/2014/11/protecting-owncloud-against-bruteforce-attacks-with-fail2ban.html

CloudFlare Page Rules for WordPress Caching

CloudFlare only caches static content like css, jpg, etc. by default to enable faster load times for your site; however you can take advantage of Page Rules to make CloudFlare cache everything including the HTML. The problem with enabling this level of caching for WordPress is that it will cache:

  • The entire wp-admin section allowing a non-privileged user to load the admin site by typing in the URL
  • Preview URLs when you’re drafting a new page/post making it difficult to see your changes
  • wp-login.php getting you stuck in a redirect loop so you can’t login.

As a CloudFlare Free user, you will only have 3 Page Rules to work with; one will turn on caching of everything, leaving you with two rules to disable caching of the admin section, preview urls, and wp-login.php.

You could make a Page Rule with the pattern *domain.com/wp-* to prevent caching of both /wp-admin/ and wp-login.php; this leaves you with one rule left to prevent preview url caching with the pattern *domain.com/*preview=true*. However the pattern *domain.com/wp-* will also prevent caching of your static content since it matches the WordPress wp-content folder where most of it is located.

To solve this problem I used the WordPress plugin Rename wp-login.php to change my login URL to https://blog.thirdechelon.org/wp-admin[randomstring]/ – now you can prevent caching of the login page and admin sections with a single rule using pattern *domain.com/wp-admin* and you’ll still have two rules left to prevent caching of previews and to enable full caching of everything.

Below are the Page Rules I use for caching this blog (order matters); you’ll also want to install the WordPress Sunny Plugin to purge CloudFlare’s cache automatically when you make updates.

pagerule1pagerule2

CentOS MotD Generator

Recently a friend of mine showed me the cool MotD message he set up on his Ubuntu server that displays upon ssh login; it displays useful information such as OS & kernel version, uptime, system load, memory usage and other system stats. After some searching I found a MotD generator for CentOS here; it’s made up of two scripts: count_yum_updates.sh and generate_motd.sh. As the names imply, the first script counts the number of yum updates available, whose output will be read by the second script when it creates the MotD banner. Below are the instructions I’ve adapted from the author’s site on how to install it.

Install the dependencies for the scripts:

Download the scripts and make them executable:

Test the scripts to see if they work correctly:

If everything works, you should see similar output to below:

centos_motd

Copy scripts to their final locations:

Make a cron job to run count_yum_updates.sh automatically (adjust for your own preferred interval):

Now you’ll get a nice MotD whenever you log in with ssh. These scripts worked perfectly fine on a CentOS droplet at Digital Ocean but at RamNode the MotD did not display the IP address of the server. I’m not sure if it was because they were OpenVZ or not but I fixed the issue by modifying line 80 of generate_motd.sh:

Original line 80:

Modified:

Protect WordPress Login Using Fail2Ban and Cloudflare

I’ve discovered a way to protect my WordPress site from brute force attacks thanks to these two guides I found:

DDOS PROTECTION WITH CLOUDFLARE AND FAIL2BAN
WordPress Login Security with Fail2Ban

The best part is these guides do not require installing yet another plugin to WordPress. If your WordPress site does not sit behind Cloudflare, you can just follow the second guide; if you are using Cloudflare however, that guide won’t do anything for you because iptables will only ever see IP addresses from Cloudflare, not your attacker. To make it work with Cloudflare, we need the action filter created in the first guide.

The following steps are a combination of the two guides above and are what I used to configure fail2ban to ban IPs at Cloudflare after failed logins on WordPress; if you haven’t done so already you need to install mod_cloudflare for Apache so it can see the IPs of visitors instead of Cloudflare’s. It’s also a good idea to configure iptables to only allow HTTP/HTTPS traffic from Cloudflare so they can’t bypass it and browse your site directly; the list of Cloudflare IPs is available here as a text file.

First we need to make WordPress log failed authentication attempts; edit the functions.php of your site’s theme and add the following:

Next we need edit /etc/rsyslog.conf and add the following lines under the “Rules” section:

Since we’ve added a new log, we should configure logrotate; add the following to the bottom of /etc/logrotate.conf:

Restart rsyslog with:

Next we create the filter for fail2ban to use; create a new file /etc/fail2ban/filter.d/wordpress.conf with the following contents:

Now we define the action for fail2ban to use; create a new file /etc/fail2ban/action.d/cloudflare.conf with the contents below. Remember to insert your Cloudflare email address and API Key at the bottom.

Now that we have the filter and action created for fail2ban we can add the jail to /etc/fail2ban/jail.local:

Restart fail2ban and it will watch /var/log/wp_f2b.log for failed WordPress authentication and use the Cloudflare API to ban/unban IPs.

Nginx Reverse Proxy with Deluge Web UI

Last year I experimented with using a seedbox for torrenting; I built one using CentOS and Deluge and took a snapshot before I decided to stop using it. Recently I tried deploying it again from the snapshot and found the Deluge Web UI unreachable as Chrome displayed the error message ERR_SSL_VERSION_OR_CIPHER_MISMATCH. It appears in the time since I built it, browsers have stopped supporting SSLv3 due to the POODLE vulnerability. According to this thread, it can be fixed by updating to a newer version of Deluge; however I needed to keep using version 1.3.6 because reasons. Fortunately I was able to configure Nginx as a reverse proxy with SSL enabled for the Deluge Web UI; instead of connecting to the Deluge Web UI directly, I can connect to it through Nginx over HTTPS while the Web UI continues to listen on localhost:8112. Nginx is easy to install and there are many guides on the internet; here’s one for Ubuntu 14.04 and one for CentOS 6.

Below is my configuration for proxying Deluge Web UI through Nginx with SSL enabled; I found the SSL cipher settings on a blog post about hardening SSL ciphers here and the proxy settings on the Deluge Bug Tracker here.


Windows Deployment Services – Event ID 772 and Capture Boot Image failure

I recently tried to set up Windows Deployment Services (WDS) on Server 2012 R2 in my home lab environment; WDS has been around since Windows 2003 and sadly I’ve never tried using it until now. It allows you to deploy Windows operating systems quickly by allowing workstations to PXE boot from a WDS server; you no longer need a DVD or USB stick with Windows on it in order to image a desktop or laptop. You can simply boot a machine via PXE and select the appropriate image to install; you can also include driver packages to be installed automatically or build your own custom images by capturing a sysprepped machine.

Installing Windows Deployment Services is straight forward; if you’ve added a Server Role before like DNS or DHCP then you’ll be familiar with the process. You can read more about it here. I already had a 2012 R2 VM running as a Domain Controller; I added the WDS role first and then the DHCP role as I needed to provide DHCP Options 60, 66 and 67. I initially only added options 66 and 67 for the server IP and boot path; I didn’t immediately notice a way to specify Option 60 and tried PXE booting my notebook anyway. The PXE boot process failed (connection timeout) and I noticed the Event Log on the WDS Server had one error concerning Event ID 772:

wds_event_log

After looking up Event ID 772, I found the issue was due to having WDS and DHCP running on the same machine; it seems they both listen on some of the same ports which why the error log mentions “some other application is already using the port.” I fixed this by enabling the following options in the WDS Server properties:

wds_dhcp

These options can also be enabled by command line:

After enabling those options I was able to successfully boot from an install image I had added. Next I tried creating a custom install image based the Windows install that was already on my notebook. I created a capture image by following the TechNet instructions but it gave an error when I tried to boot from it; the error was a “Windows failed to start” message similar to this one:

winloaderror

I don’t know how but someone in this thread figured out that mounting and unmounting the capture image resolves the issue. I issued the following commands to fix my capture image:

Now I could boot my capture image and after fixing my issue with sysprep, I was able to capture and upload the Windows install on the notebook (complete with applications and drivers) to the WDS Server. I installed the image I captured but ran into an error message as Windows was booting: “Windows could not finish configuring the system”.

Fifth Freedom