Category Archives: Linux

DNS-Over-HTTPS on Pi-hole (cloudflared setup on Ubuntu)

I’ve been running Pi-hole with DNS-Over-HTTPS using Cloudflare’s DoH client (cloudflared) for some time now; I followed the guide posted here on the official Pi-hole documentation site. When updating the cloudflared recently, I noticed it displayed some errors when the service tried to start up. After digging around, I found that cloudflared now has an option to install itself as a service whereas the guide I used includes steps for creating the service manually. Thus, I believe this is a simpler way to setup cloudflared as your DNS-Over-HTTPS client for Pi-hole.

Download the cloudflared daemon and install it:

Create a folder and config file for the cloudflared daemon:

Use the following command to instruct cloudflared to install itself as service:

Start the new cloudflared service and check the status:

You should get output similar to the following if successful:

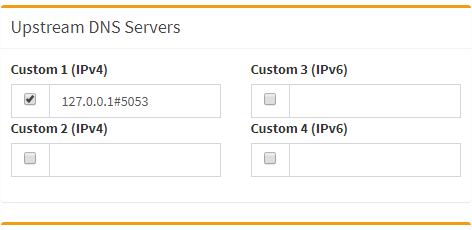
Now just configure Pi-hole to use cloudflared as the DNS resolver:

Flood-UI and Rtorrent on Ubuntu 18.04/16.04

I was bored yesterday and googled “best bittorrent web client” and eventually stumbled onto Flood-UI – it’s a nice modern webui for rtorrent. You can find multiple screenshots of it here. I followed this guide but I had to make some changes for it work on my seedbox; most of the instructions below are taken from the guide I used.

Install rtorrent, setup a user to run rtorrent and make an rtorrent config file:

Paste the following into .rtorrent.rc; you can customize the ports you want to use for rtorrent here:

Create the directories as specified in the above config file for rtorrent; I couldn’t think of a better place to put everything so I just used the paths in the guide.

Create a systemd script for rtorrent:

Give it the following contents:

Enable and start the rtorrent service:

This is where I had to deviate from the guide I was using and install Node.JS/Flood differently; when I followed the guide as is I couldn’t get Flood to build/install correctly. After fixing that issue, I noticed files wouldn’t get deleted when removing torrents (even with the option checked to delete files); the solution to this was to just run both rtorrent and Flood as the same user.

My seedbox didn’t have git or curl installed so I installed those first:

Next I installed the latest version of Node.JS following this guide:

I also needed to install gcc g++ and make:

Next clone the repo from Git and make a config file for Flood. Per the official documentation you should edit config.js and change the secret value to something long and unique (the default value is flood). If you run into permission errors while running git or npm, try changing ownership of /srv/torrent to your user before you run those commands. I had to do this when I tried to repeat this guide on a new box where I wasn’t logged in as root; just remember to give ownership back to rtorrent when finished.

Next install Flood:

Give our previously created user permissions to run flood:

Create a systemd script for Flood:

Give it the following contents:

Enable and start the Flood service:

Flood and rtorrent should be running at this point; the default port for Flood is 3000. Since I already had nginx configured as a reverse proxy for the Deluge WebUI, I just edited my nginx config to point to Flood instead. The official documentation has additional details on using Flood behind a reverse proxy here. If you are going to access Flood directly by IP, you may need to edit config.js and update the floodServerHost and floodServerProxy to the IP address of your server.

When logging into Flood for the first time, you will need to register; pick your username/password and provide the IP and Port for rtorrent:

Vlmcsd on Ubuntu 18.04

vlmcsd is an open source KMS emulator that can run on a variety of CPU architectures and operating systems.  You can find it officially on the My Digital Life forum (registration required) although at least one other person has mirrored it on GitHub. I’ve been running it for the past few months on my Skull Canyon NUC running Ubuntu 18.04; below are instructions to get it running as a service.

The easiest way to download is through Github. I also renamed the binary to just vlmcsd to make it simpler and copied it to /usr/local/bin:

Make a user to run vlmcsd as a service and give the user permissions on the binary:

Create a systemd script:

Give it the following contents:

Make a folder under /var/log for logging and give the vlmcsd user permissions:

Now you just need to enable and start the service:

Check the status of the service:

If all goes well, you should see output similar to below:

To activate a product like Office 2016 against this KMS emulator, you can use the ospp.vbs script located in your Office installation folder:

Pi-hole – Dnsmasq Not Starting Automatically (Ubuntu 16.04)

Pi-hole is a DNS sinkhole designed to block ads at the network level by acting as your DNS server; it’s like using AdBlock for every device on your network. It’s especially useful for iOS and Android devices since Pi-hole can block ads in both the browser and apps.

Installation on my Ubuntu 16.04 box was dead simple:

After running it for almost a week, I accumulated the following stats below; it’s amazing how many requests were blocked since I’m already using uBlock in Chrome.

After rebooting the system Pi-hole was running on, I noticed the DNS resolution was broken because the dnsmasq service was not running:

Apparently there is a bug in Ubuntu 16.04 with the dnsmasq service trying to start before network interface is up. Thanks to this, I was able to fix it by adding the highlighted lines below to the [Unit] section of /lib/systemd/system/dnsmasq.service:

Kodibuntu and TL-WN822N v3 Wireless Fix

I have a Zotac MAG HD-ND01-U I bought almost 5 years ago that I use to play movies for the family. Even at the time I bought it, the Zotac was very low end; it ships with an Intel Atom N330 CPU, Nvidia ION GPU, 160GB 5400RPM HDD and 2GB of RAM. It has been since upgraded to a 500GB 7200rpm HDD and 4GB of RAM. Previously I was just running Win7 and using MPC-HC to play movies on the big screen. The Zotac was just barely capable of playing 1080p x264 mkvs with that combination; CPU usage was still very high despite using hardware acceleration in LAV Video Decoder. It was also really annoying waiting for Windows processes (TrustedInstaller.exe and svchost.exe) to stop eating CPU cycles after boot up. I decided it was time to take look at Kodi; a software media center formerly known as XBMC. I made a Live USB of Kodibuntu and spent a couple hours just trying to get it to find my movie library over the network; when I finally got a movie to play, it played perfectly with no jitter and very low CPU usage. If anyone out there is wondering if an Intel Atom and Nvidia ION are enough to play 1080p x264 mkvs, I can assure you it will play perfectly under Kodibuntu. However it will struggle with mkvs encoded in 10bit.

After the successful trial of the Live USB, I rebooted and performed the full installation thinking that maybe the network issue was just the Live USB environment. After the full install, I tried installing updates and the network would stop working after a few minutes. I did some searching online and apparently the driver that ships with Ubuntu based distributions doesn’t work properly with the TL-WN822N v3 USB wireless adapter I was using. I found the solution here via this page of the Ubuntu Community Help Wiki. I’ve included all the commands from the solution below; they will install a patched driver and remove the native one.

OwnCloud 8 on CentOS 6.6 Using Nginx and PHP-FPM

Earlier this week I decided to test drive ownCloud; an open source alternative to cloud sync services like Google Drive or Dropbox. The main difference is that you install and run ownCloud on your own server.

ownCloud provides packages for most Linux distributions including CentOS here; the advantage of installing from the package is that it will automatically install required dependencies and you can  update ownCloud with yum. If you use the ownCloud package, you will also need Remi’s RPM repository as CentOS 6 provides PHP 5.3 and ownCloud 8 requires PHP 5.4.

Since I already had a server running Nginx I decided to skip the package installation of ownCloud because it also installs Apache as a dependency. The steps below can be used to set up ownCloud 8 on CentOS using Nginx, PHP-FPM and MySQL.

Set up Nginx and Remi repos:

Install Nginx, MySQL and PHP components:

Start MySQL and run mysql_secure_installation script to create root password (answer Y to all questions):

Now create the database and user for ownCloud:

Create document root for Nginx and install ownCloud:

Edit /etc/php-fpm.d/www.conf to replace apache user with nginx on lines 39 and 41:

Give nginx user permissions on /var/lib/php/session (this fixed a redirect loop I was getting when trying to login):

Make sure services start automatically on boot:

Now you just need to configure Nginx to work with ownCloud; below is my configuration file that I made based on the ownCloud documentation here.

Once you have Nginx configured correctly, browse to your server and you will be greeted by the following screen where you will create the admin account and provide the details of the MySQL database you created earlier:

ownCloud_setup_page

For added security, you can configure Fail2Ban to protect the ownCloud login page from brute force attempts by using the guide located here: http://www.tech-and-dev.com/2014/11/protecting-owncloud-against-bruteforce-attacks-with-fail2ban.html

CentOS MotD Generator

Recently a friend of mine showed me the cool MotD message he set up on his Ubuntu server that displays upon ssh login; it displays useful information such as OS & kernel version, uptime, system load, memory usage and other system stats. After some searching I found a MotD generator for CentOS here; it’s made up of two scripts: count_yum_updates.sh and generate_motd.sh. As the names imply, the first script counts the number of yum updates available, whose output will be read by the second script when it creates the MotD banner. Below are the instructions I’ve adapted from the author’s site on how to install it.

Install the dependencies for the scripts:

Download the scripts and make them executable:

Test the scripts to see if they work correctly:

If everything works, you should see similar output to below:

centos_motd

Copy scripts to their final locations:

Make a cron job to run count_yum_updates.sh automatically (adjust for your own preferred interval):

Now you’ll get a nice MotD whenever you log in with ssh. These scripts worked perfectly fine on a CentOS droplet at Digital Ocean but at RamNode the MotD did not display the IP address of the server. I’m not sure if it was because they were OpenVZ or not but I fixed the issue by modifying line 80 of generate_motd.sh:

Original line 80:

Modified:

Protect WordPress Login Using Fail2Ban and Cloudflare

I’ve discovered a way to protect my WordPress site from brute force attacks thanks to these two guides I found:

DDOS PROTECTION WITH CLOUDFLARE AND FAIL2BAN
WordPress Login Security with Fail2Ban

The best part is these guides do not require installing yet another plugin to WordPress. If your WordPress site does not sit behind Cloudflare, you can just follow the second guide; if you are using Cloudflare however, that guide won’t do anything for you because iptables will only ever see IP addresses from Cloudflare, not your attacker. To make it work with Cloudflare, we need the action filter created in the first guide.

The following steps are a combination of the two guides above and are what I used to configure fail2ban to ban IPs at Cloudflare after failed logins on WordPress; if you haven’t done so already you need to install mod_cloudflare for Apache so it can see the IPs of visitors instead of Cloudflare’s. It’s also a good idea to configure iptables to only allow HTTP/HTTPS traffic from Cloudflare so they can’t bypass it and browse your site directly; the list of Cloudflare IPs is available here as a text file.

First we need to make WordPress log failed authentication attempts; edit the functions.php of your site’s theme and add the following:

Next we need edit /etc/rsyslog.conf and add the following lines under the “Rules” section:

Since we’ve added a new log, we should configure logrotate; add the following to the bottom of /etc/logrotate.conf:

Restart rsyslog with:

Next we create the filter for fail2ban to use; create a new file /etc/fail2ban/filter.d/wordpress.conf with the following contents:

Now we define the action for fail2ban to use; create a new file /etc/fail2ban/action.d/cloudflare.conf with the contents below. Remember to insert your Cloudflare email address and API Key at the bottom.

Now that we have the filter and action created for fail2ban we can add the jail to /etc/fail2ban/jail.local:

Restart fail2ban and it will watch /var/log/wp_f2b.log for failed WordPress authentication and use the Cloudflare API to ban/unban IPs.