My early 2009 Mac mini had recently died and I decided to try building a Hackintosh to replace it instead of buying a new Mac mini. The current Mac minis have not been refreshed since 2012 and are still using Ivy Bridge CPUs.
I had an NCASE M1 that had been sitting in my closet for the past six months so it seemed like a good time to finally put it to use. I was originally going to use a Gigabyte H87N-WIFI or Z87N-WIFI board based on the recommendations from TonyMacx86’s Buying Guides but a friend of mine had an ASRock Z87E-ITX he was not using; I went with that board instead to keep the build cost low.
The build components are:
- Intel Core i5-4440S
- ASRock Z87E-ITX
- Crucial Ballistix Sport 8GB (2 x 4GB) DDR3 1600 Low Profile
- Intel X-25M 120GB SSD (taken from my dead Mac mini)
- Slim slot loading ODD (also from my dead Mac mini)
- Corsair CS450M 80 PLUS Gold PSU
- NCASE M1
While waiting for parts to arrive, I prepared the installer using my Macbook Pro by following the instructions at http://www.tonymacx86.com/374-unibeast-install-os-x-mavericks-any-supported-intel-based-pc.html. Since I was downloading Mavericks from fresh the App Store to make the Unibeast installer, it was already updated to 10.9.3 – so I didn’t need to update after getting my Hackintosh up and running.
After receiving all of the components, the first thing I did was flash the BIOS of the Z87E-ITX using a beta bios found at http://www.tonymacx86.com/general-hardware-discussion/117344-z87e-itx-updates-15.html#post762323 – looking through that thread you will see user WonkeyDonkey has done most of the work in figuring out how to hackintosh the Z87E-ITX.
Now I was ready to try installing Mavericks. I had my monitor connected to the ASRock via Displayport; I found that after the BIOS screen that Unibeast installer screen was just black. Normally you would see something like this:

This is the screen where you press Enter to boot from USB or type in other boot parameters if you have issues reaching the installation. I also tried connecting the monitor via DVI and HDMI; both of those connections allowed me to see the Unibeast installer but would kernel panic every time despite the boot flags I tried. I left the monitor connected via Displayport and despite not being able to see anything I was still able to just hit Enter at the black screen and proceed to the Mavericks install. After completing the Mavericks install, I found that I could not boot off the installation using the Unibeast USB stick; I got a kernel panic every time (it was also tricky trying to select the install and type boot flags since the screen was completely black). Eventually it dawned on me that there was something different about the Unibeast USB environment and the new install of Mavericks sitting on my SSD; Unibeast has an Extra folder under / which contains kexts that are needed for it to boot properly on most systems in order for you to run the install. So I decided to try making the Extra folder on the Mavericks installation and copy over some of the files:
|
|
cd /Volumes/Hackintosh\ HD mkdir Extra cd Extra cp /Volumes/Unibeast/Extra/org.chameleon.Boot.plist . cp /Volumes/Unibeast/Extra/smbios.plist . mkdir Extensions cd Extensions cp -R /Volumes/Unibeast/Extra/Extensions/AppleACPIPlatform.kext . cp -R /Volumes/Unibeast/Extra/Extensions/FakeSMC.kext . |
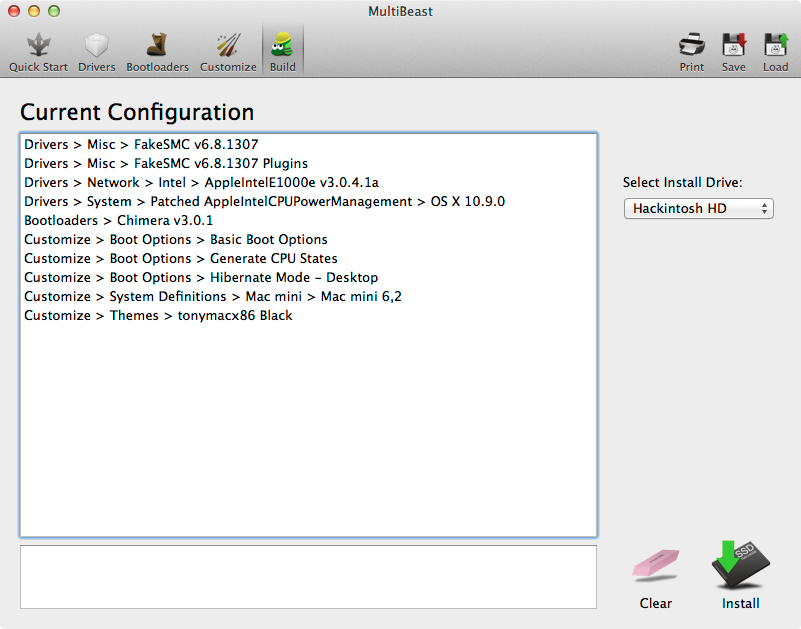
After doing this I could finally boot from the Mavericks installation and run Multibeast with the following settings:
I removed my Unibeast USB and restarted Hackintosh; it booted correctly from the SSD and the boot loader was no longer showing a black screen. Everything seemed to work pretty well and I started reinstalling my apps. Then I realized I didn’t set up the audio. Unfortunately I’m not sure exactly how I got the audio working. I forgot to install the ALC1150 kext during the first run of Multibeast; I opened it again and chose just the ALC1150 and “Optional EFI Installed Bootloader Support”. After the reboot the audio was still not working. Then I tried running Multibeast again with ALC1150 and the DSDT.AML that is included in the zip with the 2.30A bios from the post I mentioned earlier. This just made my Hackintosh freeze at the Apple logo so I had to boot from Unibeast USB and use the Terminal to delete DSDT.AML from my /Extra folder. After doing this and booting into Mavericks again I found that the audio was working perfectly. Weird.
So far it appears to be stable and everything I have tested works: Bluetooth pairing with Apple Wireless Keyboard and Apple Magic Trackpad, ethernet, audio, hardware monitoring via iStat Menus, Intel SpeedStep and even Sleep (although it seems it will not wake up via Bluetooth, need to push power button to wake it up).
EDIT: My Hackintosh appears to hang during heavy network loads and it appears the version of AppleIntelE1000e I used is unstable (see http://blog.thireus.com/tag/appleintele1000e-kext). I’ve installed v2.4.14 instead and it seems to be ok.


