
Recently I’ve stumbled onto Mailgun, a transactional email service targeted at developers; they provide an API to easily craft and send email messages through their service. You can verify your domain with them using a few TXT records and once configured, you can send emails using your own domain. Currently, Mailgun allows up to 10,000 emails per month for free; adding your credit card info to your account unlocks 30 days of log retention (instead of 2 days) and allows you to add up to 1000 domains. They also provide an SMTP relay that uses ports 25, 2525, 467 and 587 and it supports SSL/TLS or no encryption. There have been many times where I tried to configure Scan to Email on an older multi-function printer; most of the time it didn’t support SSL/TLS for email and there was no on-premise Exchange or other email server to relay with. Having something like Mailgun back then would’ve been nice. Now that I’ve found Mailgun, I was able to delete a spare Google Apps account that I was only using to send email notifications for my computer backups and Synology NAS.
Monthly Archives: March 2015
How to Internet Speed Test Your VPS
If you’re using a hosted Linux server for web hosting or cloud services, you might be curious what kind of download/upload speeds your server has. Since many hosted servers are running headless you can’t simply go to www.speedtest.net and get your speed results that way. Fortunately, someone created a Python script called speedtest-cli that can be used from the Linux command line to run a simple test.
Simply download speedtest-cli to directory of your choice and run it:
|
1 2 3 |
wget https://raw.github.com/sivel/speedtest-cli/master/speedtest_cli.py chmod a+rx speedtest_cli.py ./speedtest_cli.py |
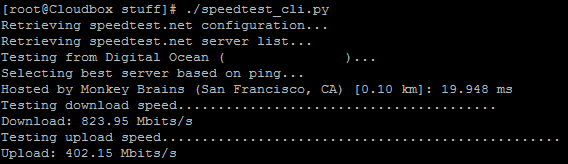
Without any parameters, the script will automatically find the best server and run a test:
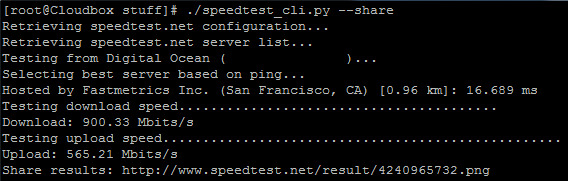
You can also specify the –share parameter to generate a URL for sharing the results image:
You can see the rest of the parameters by running speedtest-cli -h:
|
1 2 3 4 5 6 7 8 9 10 11 12 13 14 15 16 17 18 19 20 21 22 23 |
speedtest-cli -h usage: speedtest-cli [-h] [--bytes] [--share] [--simple] [--list] [--server SERVER] [--mini MINI] [--source SOURCE] [--timeout TIMEOUT] [--version] Command line interface for testing internet bandwidth using speedtest.net. -------------------------------------------------------------------------- https://github.com/sivel/speedtest-cli optional arguments: -h, --help show this help message and exit --bytes Display values in bytes instead of bits. Does not affect the image generated by --share --share Generate and provide a URL to the speedtest.net share results image --simple Suppress verbose output, only show basic information --list Display a list of speedtest.net servers sorted by distance --server SERVER Specify a server ID to test against --mini MINI URL of the Speedtest Mini server --source SOURCE Source IP address to bind to --timeout TIMEOUT HTTP timeout in seconds. Default 10 --version Show the version number and exit |
Mumble – Low Latency, High Quality Voice Chat
My friends and I originally used Ventrilo for our voice communications during long sessions of WoW raiding and other games; along the way we eventually started using Skype as it didn’t require a server and we didn’t have to push a button to talk. Somehow I stumbled upon this video demonstrating the latency differences between Mumble and Ventrilo and immediately decided that we should be using Mumble for voice chat.
There seems to be plenty of sites you can order Mumble servers from but I decided it would be a good learning experience to build my own from the ground up. I spun up a new CentOS droplet at DigitalOcean and followed the instructions at a blog I found. If you use this guide, you’ll find your mumble.ini configuration file under /opt/mumble-server – the Mumble Wiki has the details on each parameter but Mumble will just work out of the box without doing anything further. Additionally, if you want to use a real SSL cert with Mumble like I did, you can use this guide from the Mumble Wiki.
Pingdom – Free Site Monitoring and Speed Test
I’ve been using Pingdom to monitor the uptime and performance of this blog; I originally found it on someone else’s blog while doing research on Apache/Wordpress. With a free account you can get a monthly report of your site’s uptime, number of outages and average response time. You can also configure a custom page like this one to display an overview of your site’s performance stats. Finally, you can use their speed test to benchmark your site’s load time and it offers recommendations on how to improve it; you can also choose from different locations around the world to test your site from.


2015 GS350 Garage Door Opener Pairing
I recently tried programming the garage door opener built into the auto-dimming mirror of a 2015 Lexus GS350. The manual provides two sets of instructions: one titled “Programming HomeLink” and a second titled “Programming a rolling code system”. I initially had some difficulty getting it to work as it was not obvious you need to follow both sets of instructions sequentially if you have a garage door system that uses a rolling code.
So first, with your existing garage door remote pointed at the mirror, you need to press and hold one of the HomeLink buttons on the mirror and then press and hold your remote until the indicator light (on the mirror) blinks rapidly. Then you need to press the training button on your garage door opener unit; now press and hold the mirror’s HomeLink button for 2 seconds and then repeat. Now the mirror should be successfully programmed to open your garage door. Here is a link to more detailed instructions directly from the GS350 manual.